UKCA Chemistry and Aerosol Tutorials: Configuring X2Go for AWS
UKCA Chemistry and Aerosol Tutorials at vn11.8
To use the UKCA Tutorials on the JASMIN Unmanaged Cloud you first need to download and install X2Go client. This is available for Windows, macOS, and GNU/Linux.
You will be provided with connection details to your personal VM and the required SSH key file that you will need.
SSH key files
Before you set up X2Go, you need to be sure that your SSH-key files are in the correct format. There will be two text files, which look like:
- id_rsa_ukcatrXX: This is your private key and you should not share this file with anyone. It is this file that you need to use to connect using X2Go. It does not have a file extension. It will have a large block of random text in between the following lines:
-----BEGIN OPENSSH PRIVATE KEY-----

-----END OPENSSH PRIVATE KEY-----
- id_rsa_ukcatrXX.pub: This is your public key, and has the .pub file extension. It contains a single line beginning with ssh-rsa followed by a long string of random numbers and letters.
Setting up X2Go
When first starting X2Go, you should be presented with a new session dialog box to complete. If this doesn't appear, press the "New Session" button (which looks like a piece of paper with a star on it). Once this is open, fill in the details below.
When setting up an X2Go session, the exact value of “session name” is not important. The key details are the settings under “server” and “proxy server”. You will also need to set the “session type” to LXDE.
| Option | Setting |
|---|---|
| Session name | e.g. ukcatrXX@ukca-vmXX |
| Host | ukca-vmXX |
| Login | ukcatrXX |
| Use RSA/DSA key for ssh connection | The path to your id_rsa_ukcatrXX key file (navigate via button) |
| Use Proxy server for SSH connection | Tick checkbox |
| Proxy server – Host | 192.171.139.44 |
| Proxy server – same login as on X2Go server | Tick checkbox |
| Proxy server – same password as on X2Go server | Tick checkbox |
| Proxy server – RSA/DSA key | The path to your id_rsa_ukcatrXX key file (navigate via button) |
| Session type | Select LXDE from drop-down menu |
Note: On macOS you may need to maximise the Session Preferences window (using the green + marker in the top left corner) to allow you to set the session type and press the OK button, as this panel is quite long and these buttons will then become lost below the screen.
When you have completed everything, press OK. The first time you connect you will be asked if you which to accept the host key. Click yes. Once you have set the preferences you should get a grey box representing your session, e.g.

You should double-click at the top of the box (i.e. over the session name or on the icon) to start the connection. If you have closed a session down but left X2Go running you may instead see a grey box with the login field as ukcatrXX and the password field blank - to connect in this case just press OK.
When you connect to your VM using X2Go you will be presented with an open Linux terminal which is asking for your MOSRS password. Once you have entered it, the first time you login you will also be asked for your MOSRS username. Subsequently, you will just be asked for your MOSRS password.
When you have finished for the day you can close the connection by closing the X2Go window using the X in the corner. When you reconnect you will find the windows exactly as you left them. You can also resize the X2Go window using the maximize button or by dragging the corners with your mouse.
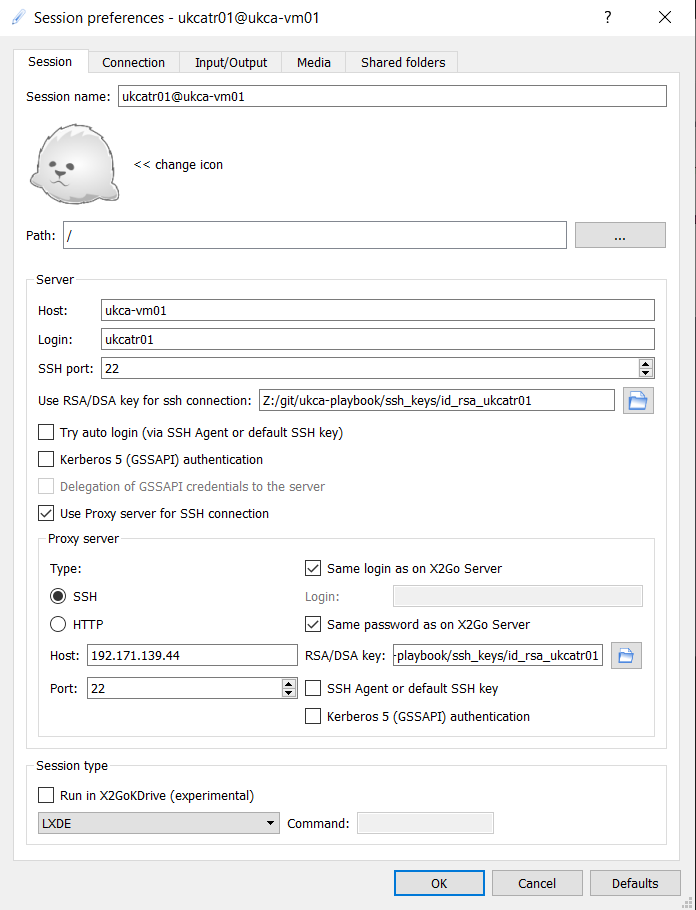
Example X2Go settings panel

X2Go connection to a VM, showing the terminal connecting to MOSRS for the first time.


MOSRS Password
You will need to enter your MOSRS password each day, and for each terminal that you open on the VM when using X2Go that you wish to commit changes or run suites from.
If you leave your terminal open overnight, in the morning you should use the command
mosrs-cache-password
to cache your password for the day.
If you do not do this each morning you may get some strange errors when committing changes or when running suites.
Connecting via a Terminal
It is also possible to connect via a terminal with an X11 connection (XQuartz would be required when using macOS). The command to use in this case would be
ssh -Y -o ProxyCommand="ssh -W %h:%p -q -i /path/to/id_rsa_ukcatrXX ukcatrXX@192.171.139.44" -i /path/to/id_rsa_ukcatrXX ukcatrXX@ukca-vmXX
where /path/to/id_rsa_ukcatrXX is the full path to your SSH private key file. It is also possible to define a .ssh/config file entry with the necessary information if desired:
Host ukca-vmXX
       Hostname ukca-vmXX
       User ukcatrXX
       IdentityFile /path/to/id_rsa_ukcatrX
       ProxyCommand ssh -W %h:%p -q -i /path/to/id_rsa_ukcatrXX ukcatrXX@192.171.139.44
so that you could then just connect using the command
ssh -Y ukca-vmXX
When you connect via a terminal you won't have a full desktop environment - you will need to navigate around the VM from the command line in the usual way.
Written by Luke Abraham 2021.