UKCA & UMUI Tutorial 5
Adding Emissions into a Tracer
At the end of the previous tutorial you will now know how to create new tracers for use by UKCA. However, after completing the tasks, your tracers will still be empty, as nothing has been put into those tracers. This tutorial will teach you how to create an emissions ancillary file that the UM will read, and that you can then tell UKCA to use and emit into your tracer(s).
Making a new Emissons Ancillary File
The UM uses its own format to read-in intial and emissions data, the ancillary file. UKCA makes use of these files for the surface and aircraft emissions, and these files can easily be made up from netCDF data using the Xancil program.
Xancil is installed on both MONSooN (on the postproc03 machine) at
/projects/um1/linux/bin/xancil
and on HECToR at
/work/n02/n02/hum/bin/xancil
You may already have this location in your PATH and so can just launch Xancil from the command line. However, before we can use Xancil to create our emissions ancillary, we must first use [http:/75/badc.nerc.ac.uk/help/software/xconv/ Xconv] to view (and possibly regrid) the raw data to the correct resolution of the UM configuration that you are using.
Regridding data with Xconv
We are using a model at N96L85 resolution. In the horizonal this is 1.875 degrees by 1.25 degrees. There are 85 vertical levels.
The N96 UM grid
- Has 192 points in longitude (x) and 145 points in latitude (y)
- Starts at 0.0 longitude with a spacing of 1.875 degrees
- Starts at -90.0 latitude (i.e. the South Pole) with a spacing of 1.25 degrees
Horizontal Regridding
Horizontal regridding in Xconv is straight-forward. First, open your dataset in Xconv by
xconv -i file.nc
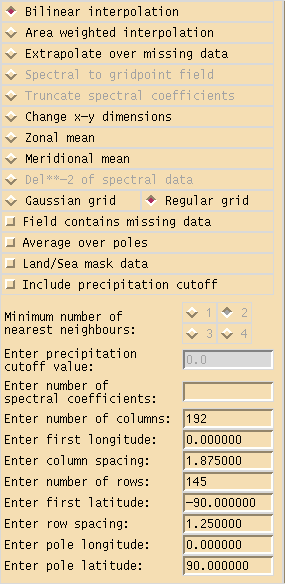
and double-click on the field that you want to regrid and then click the Trans button at the far top right. This will show a window similar to Figure 1 (which in fact shows the default settings for a N96 field).
As we are regridding an emission we need to select area weighted interpolation as we need to conserve the total amount of quantity emitted. Then scroll-down to the boxes at the end and enter the following values:
- Number of columns = 192
- First longitude = 0.000000
- Column spacing = 1.875000
- Number of rows = 145
- First latitude = -90.000000
- Row spacing = 1.250000
which match up with the grid definition above, and ensure that
- Pole longitude = 0.000000
- Pole latitude = 90.000000
Now click Apply. You should be given a message similar to
Area weighted interpolation from 720x360 Regular grid to 192x145 Regular grid
in the dialogue window. You can now extract this data as a new netCDF file (you cannot re-save a file in Xconv) by putting a name in the output file name box and clicking convert.
Vertical Regridding
It is not possible to vertically regrid data using Xconv. You will need to do this in another way. If you need to vertically regrid data, and am unsure of the best way, please contact Luke Abraham for advice.
Remember that
- Emissions data must be re-gridded in a mass conserving way, so you will probably need to integrate the field on one grid and then decompose it again on the new grid.
- Tracer data can be fitted to the profile of the field on the old grid.
Making a new ancillary file
To make a new ancillary file for your new emission(s), you should first decide on a STASH item for it/them. Currently UKCA make use of the user single-level ancillary file which uses STASH section 0 items 301-320. What these numbers correspond to is set in the file ukca_setd1defs.F90, as well as in the
Written by Luke Abraham 2013
