UKCA Chemistry and Aerosol UMvn13.0 Tutorial 5: Difference between revisions
No edit summary |
|||
| Line 7: | Line 7: | ||
| Time to Complete || '''Under 1 hour''' |
| Time to Complete || '''Under 1 hour''' |
||
|- |
|- |
||
| Video instructions || |
| Video instructions || [https://www.youtube.com/watch?v=n3yE-oYy-gU&t=4601s Walkthrough (YouTube)] |
||
|} |
|} |
||
Latest revision as of 12:47, 13 May 2023
UKCA Chemistry and Aerosol Tutorials at UMvn13.0
| Difficulty | EASY |
| Time to Complete | Under 1 hour |
| Video instructions | Walkthrough (YouTube) |
Remember to run mosrs-cache-password.
What you will do in this tutorial
Now you will start working with the Met Office Unified Model.
Copying and Running an Existing Rose Suite
| Machine | UM Version/Configuration | Suite ID |
|---|---|---|
| vm | vn13.0 N48L38 GNU Compiler: UKCA StratTrop | u-cq986 |
You will need to login to the VM using SSH via a Terminal
ssh -X ukca
Then copy the rose suite by:
rosie copy u-cq986

This will open an editor containing text similar to this:
description=Copy of u-cq986/trunk@237005
owner=lukeabraham
project=ukca
title=UMvn13.0 N48L38 GA7-Strattrop GNU/VM 1x2: UKCA Tutorials Base UM-UKCA Suite

# Make changes ABOVE these lines.
# The "owner", "project" and "title" fields are compulsory.
# Any KEY=VALUE pairs can be added. Known fields include:
# "access-list", "description" and "sub-project".
You can edit the title to make it more descriptive if you like. Then save (e.g. Ctrl-s) and close the file (e.g. Ctrl-q). The press y on the keyboard when prompted and press return. You should work with this suite in exactly the same way that you have been working with your UKCA Box Model suite.
If you are using your own VM, times will vary depending on the specifications of the host. It could take about 10 minutes to compile the code (fcm_make) for the first time (and about 1-2 minutes when recompiling), followed by about 1 minute to run the reconfiguration step (recon), and then around 10 minutes to run the UM itself (atmos). If you have been provided a VM the compile should take 1-2 minutes.
When the suite has finished successfully it will then become blank with the message stopped with 'succeeded' in the bottom-left corner. This is a StratTrop suite only. While during the remainder of the tutorial you may make changes for other schemes, you will only be able to run the StratTrop scheme in the UM.
Output Directory Structure
![Simplified cylc-run directory structure. [SUITE-ID] will be e.g. u-as101, and [CYCLE] is the cycle-point, e.g. 1 or 19880901T0000Z.](/images/1/12/Cylc-run_structure.png)
Simplified cylc-run directory structure. [SUITE-ID] will be e.g. u-as101, and [CYCLE] is the cycle-point, e.g. 1 or 19880901T0000Z.
![Simplified cylc-run directory structure. [SUITE-ID] will be e.g. u-as101, and [CYCLE] is the cycle-point, e.g. 1 or 19880901T0000Z.](/wiki/index.php/File:Cylc-run_structure.png)
The output directory structure of rose suites are rather complex. The schematic gives a broad overview of the general structure. Everything can be found within the [SUITE-ID] (e.g. u-ca021 etc.) directory, which can be found within your $HOME/cylc-run directory. On the VM, everything in held in this single place, but things are more complicated when using other machines, such as PUMA & ARCHER2, as some files are held on the ARCHER /home filesystem, some on the /work filesystem, and some files are synced back to PUMA as well. On Monsoon2, everything is held on the same machine, but with some files in /projects and some in /home.
Within this directory there are several directories, including:
- log: a symbolic link to a directory called something like log.20171214T141332Z, which contains all the job.out (containing output from UM WRITE statements from the umPrint subroutine) and job.err files etc., as well as the script used to run the job.
- work: this contains the directories used when the job actually runs. Real-time output will be sent to files here (held in a pe_output directory. Sometimes model output will also be here. On ARCHER this directory exists on the /work filesystem.
- share: This isn't used by output from the UKCA Training Suite, but for climate jobs model output will usually be held in this directory. On ARCHER this directory exists on the /work filesystem.
Within these directories there will be many sub-directories. Some of these will be named from the cycle-point (labelled [CYCLE] in the graphic. For the UKCA Training Suite this will be 1, but under normal climate operation this will be a date string, e.g. 19880901T0000Z. The sub-directories will (eventually) be named after the app (labelled by [JOB NAME] in the table below) that the output is from, e.g. fcm_make, recon, atmos etc.
| Files | General Path | Example |
|---|---|---|
| Most recent job.out files | vm: /home/vagrant/cylc-run/[SUITE-ID]/log/job/1/[JOB NAME]/NN | /home/vagrant/cylc-run/u-as297/log/job/1/atmos/NN |
| Processor output (while running) | vm: /home/vagrant/cylc-run/[SUITE-ID]/work/1/[JOB NAME]/pe_output | /home/vagrant/cylc-run/u-as297/work/1/atmos/pe_output |
| Output files in 64-bit fieldsfile format | vm: /home/vagrant/cylc-run/[SUITE-ID]/work/1/atmos | /home/vagrant/cylc-run/u-as297/work/1/atmos |
Notes
- The job.out files can also be viewed through the Gcylc GUI right-click menu from each job.
- A handy command to check the progress of the atmos job is
- vm: tail -1000f atmos.fort6.pe0 | grep Atm_Step
- Other suites may put the output fieldsfiles into a different location, e.g.
- /work/n02/n02/$USER/cylc-run/[SUITE-ID]/share/data/History_Data
- and there are also post-processing settings that can be used to copy data to the RDF or JASMIN as the suite runs.
- Output fieldsfiles can have various naming conventions. For these suites, they will be atmosa.pa19810901_00, but more generally they are likely to be of the form
- [SHORT SUITE-ID]a.p[abcdefghijkmsyx]YYYYMMDD
- e.g. ag308a.pk19880901
- [SHORT SUITE-ID]a.p[abcdefghijkm]YYYYmon
- e.g. ak468a.pe1989oct
- Climate-mean files (.pm) will often also have seasonal (.ps), annual (.py), and decadal (.px) equivalents.
Whilst this is running, continue to explore the UM-UKCA Rose suite.
Exploring Rose
Take a look at your suite, and click through the options. As with the UKCA box model suite, there are 2 key sections that you will need to consider:
fcm_make
Also often called fcm_make_um.
This section controls which fcm branches are used by the model, and also what compiler settings are used etc. You should go to fcm_make env Sources to see what branches are being used (although there are none used by the UKCA training suite). During the course of these tutorials you will make a branch and add it here to complete the tutorial tasks. You can add both relative paths to the repository (starting with branches/) and absolute paths to a working copy (starting with /home/).

um

Click the arrow by um to view the list of sections. We'll be most interested in the namelist section, which contains all the settings that configure the science that will be done in this configuration of the UM, including the UKCA-specific options, and also when adding more output. We will mostly be concerned with 2 sections:
STASH Requests
Go to um namelist Model Input and Output STASH Requests and Profiles STASH Requests to view all the model output that has been requested by this suite. This list can be quite extensive, and we will cover adding more output in Tutorial 6: What is STASH?. During these tutorials this will be know as the STASH panel.
Section 34 - UKCA: UK Aerosols and Chemistry
Go to um namelist UM Science Settings. This contains all the different science sections, and by clicking on each panel you can see the settings for each. If you click on Section 34 - UKCA: UK Aerosols and Chemistry you will be able to see the UKCA settings, which has been organised into various sub-panels covering Chemistry (including Heterogeneous Chemistry, Photolysis, and Trace Gases), Emissions, Feedbacks, and GLOMAP. During these tutorials these will be known as the UKCA panels.
In Rose there is a 1:1 correspondence between the name of the variable in Rose, and the name of the variable in the namelist and hence the UM. This means that it can be easy to find what variable you might be interested in by first finding the appropriate variable in Rose (e.g. l_ukca_ageair). By the name of each variable is a cog - if you click this you can view info about the variable, which lists all the information the Rose has been given about it, e.g.
Data
name  i_ageair_reset_method
value  1
comments
error
flags
ignored_reason
warning

Metadata
compulsory  true
description  Method of resetting near-surface values of Age-of-air tracer
full_ns  /um/namelist/UM Science Settings/section34
help  There are two options available for resetting the near-surface values
 of the age-of-air tracer to 0.0:
 1. based on maximum level upto which to reset
 2. based on maximum height upto which to reset
 If 'by level' selected,
 recommended value is 10 for consistency
 with older UKCA configurations
 If 'by height' selected,
 the standard value is 2000.0 metres
id  namelist:run_ukca=i_ageair_reset_method
sort-key  a09
trigger  namelist:run_ukca=max_ageair_reset_level: 1 ;
namelist:run_ukca=max_ageair_reset_height: 2 ;
value-titles  Reset by level,Reset by height
values  1,2
You can also click help, which lists the help text associated with each variable. If you are not sure about a variable, looking at the info can be very informative. Due to the way the change process of the UM works, all variables must have information, such as the above, supplied, and any new science that has been added also needs to be added to each sections documentation paper.
search
Unlike the UMUI, there is a search box in Rose. It works best if you know the name of a variable, although it is still very useful to find options if you're not sure where they are.
Please take some time to browse through the rose suite, and get a feel for where things are. If you previously used the UMUI, you might want to try to locate comparable panels to see how things have changed.
Viewing Output
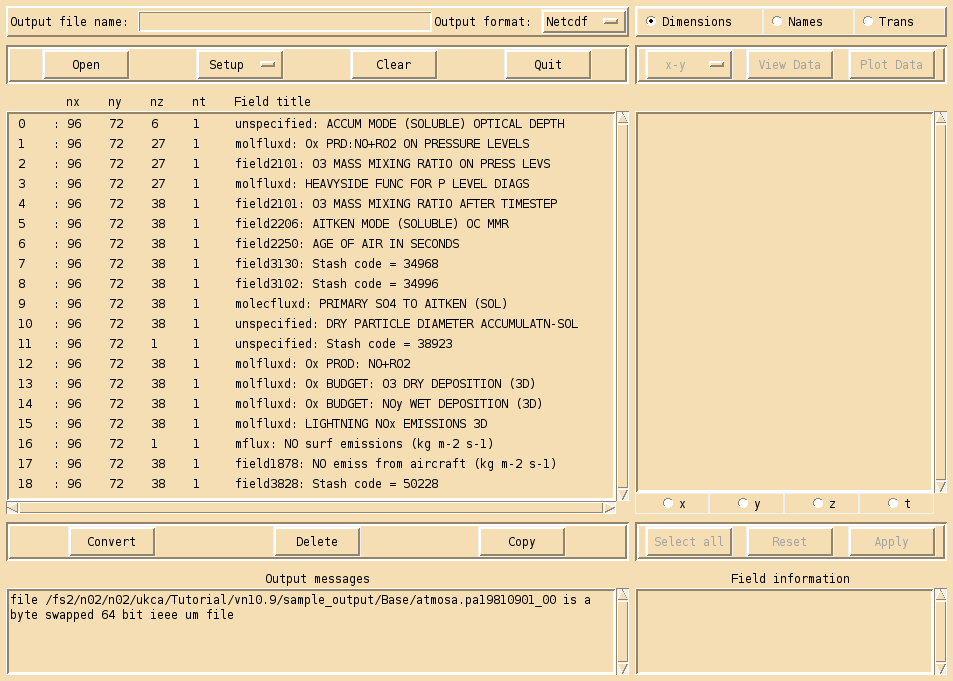
Example output from the UKCA training suite viewed in Xconv
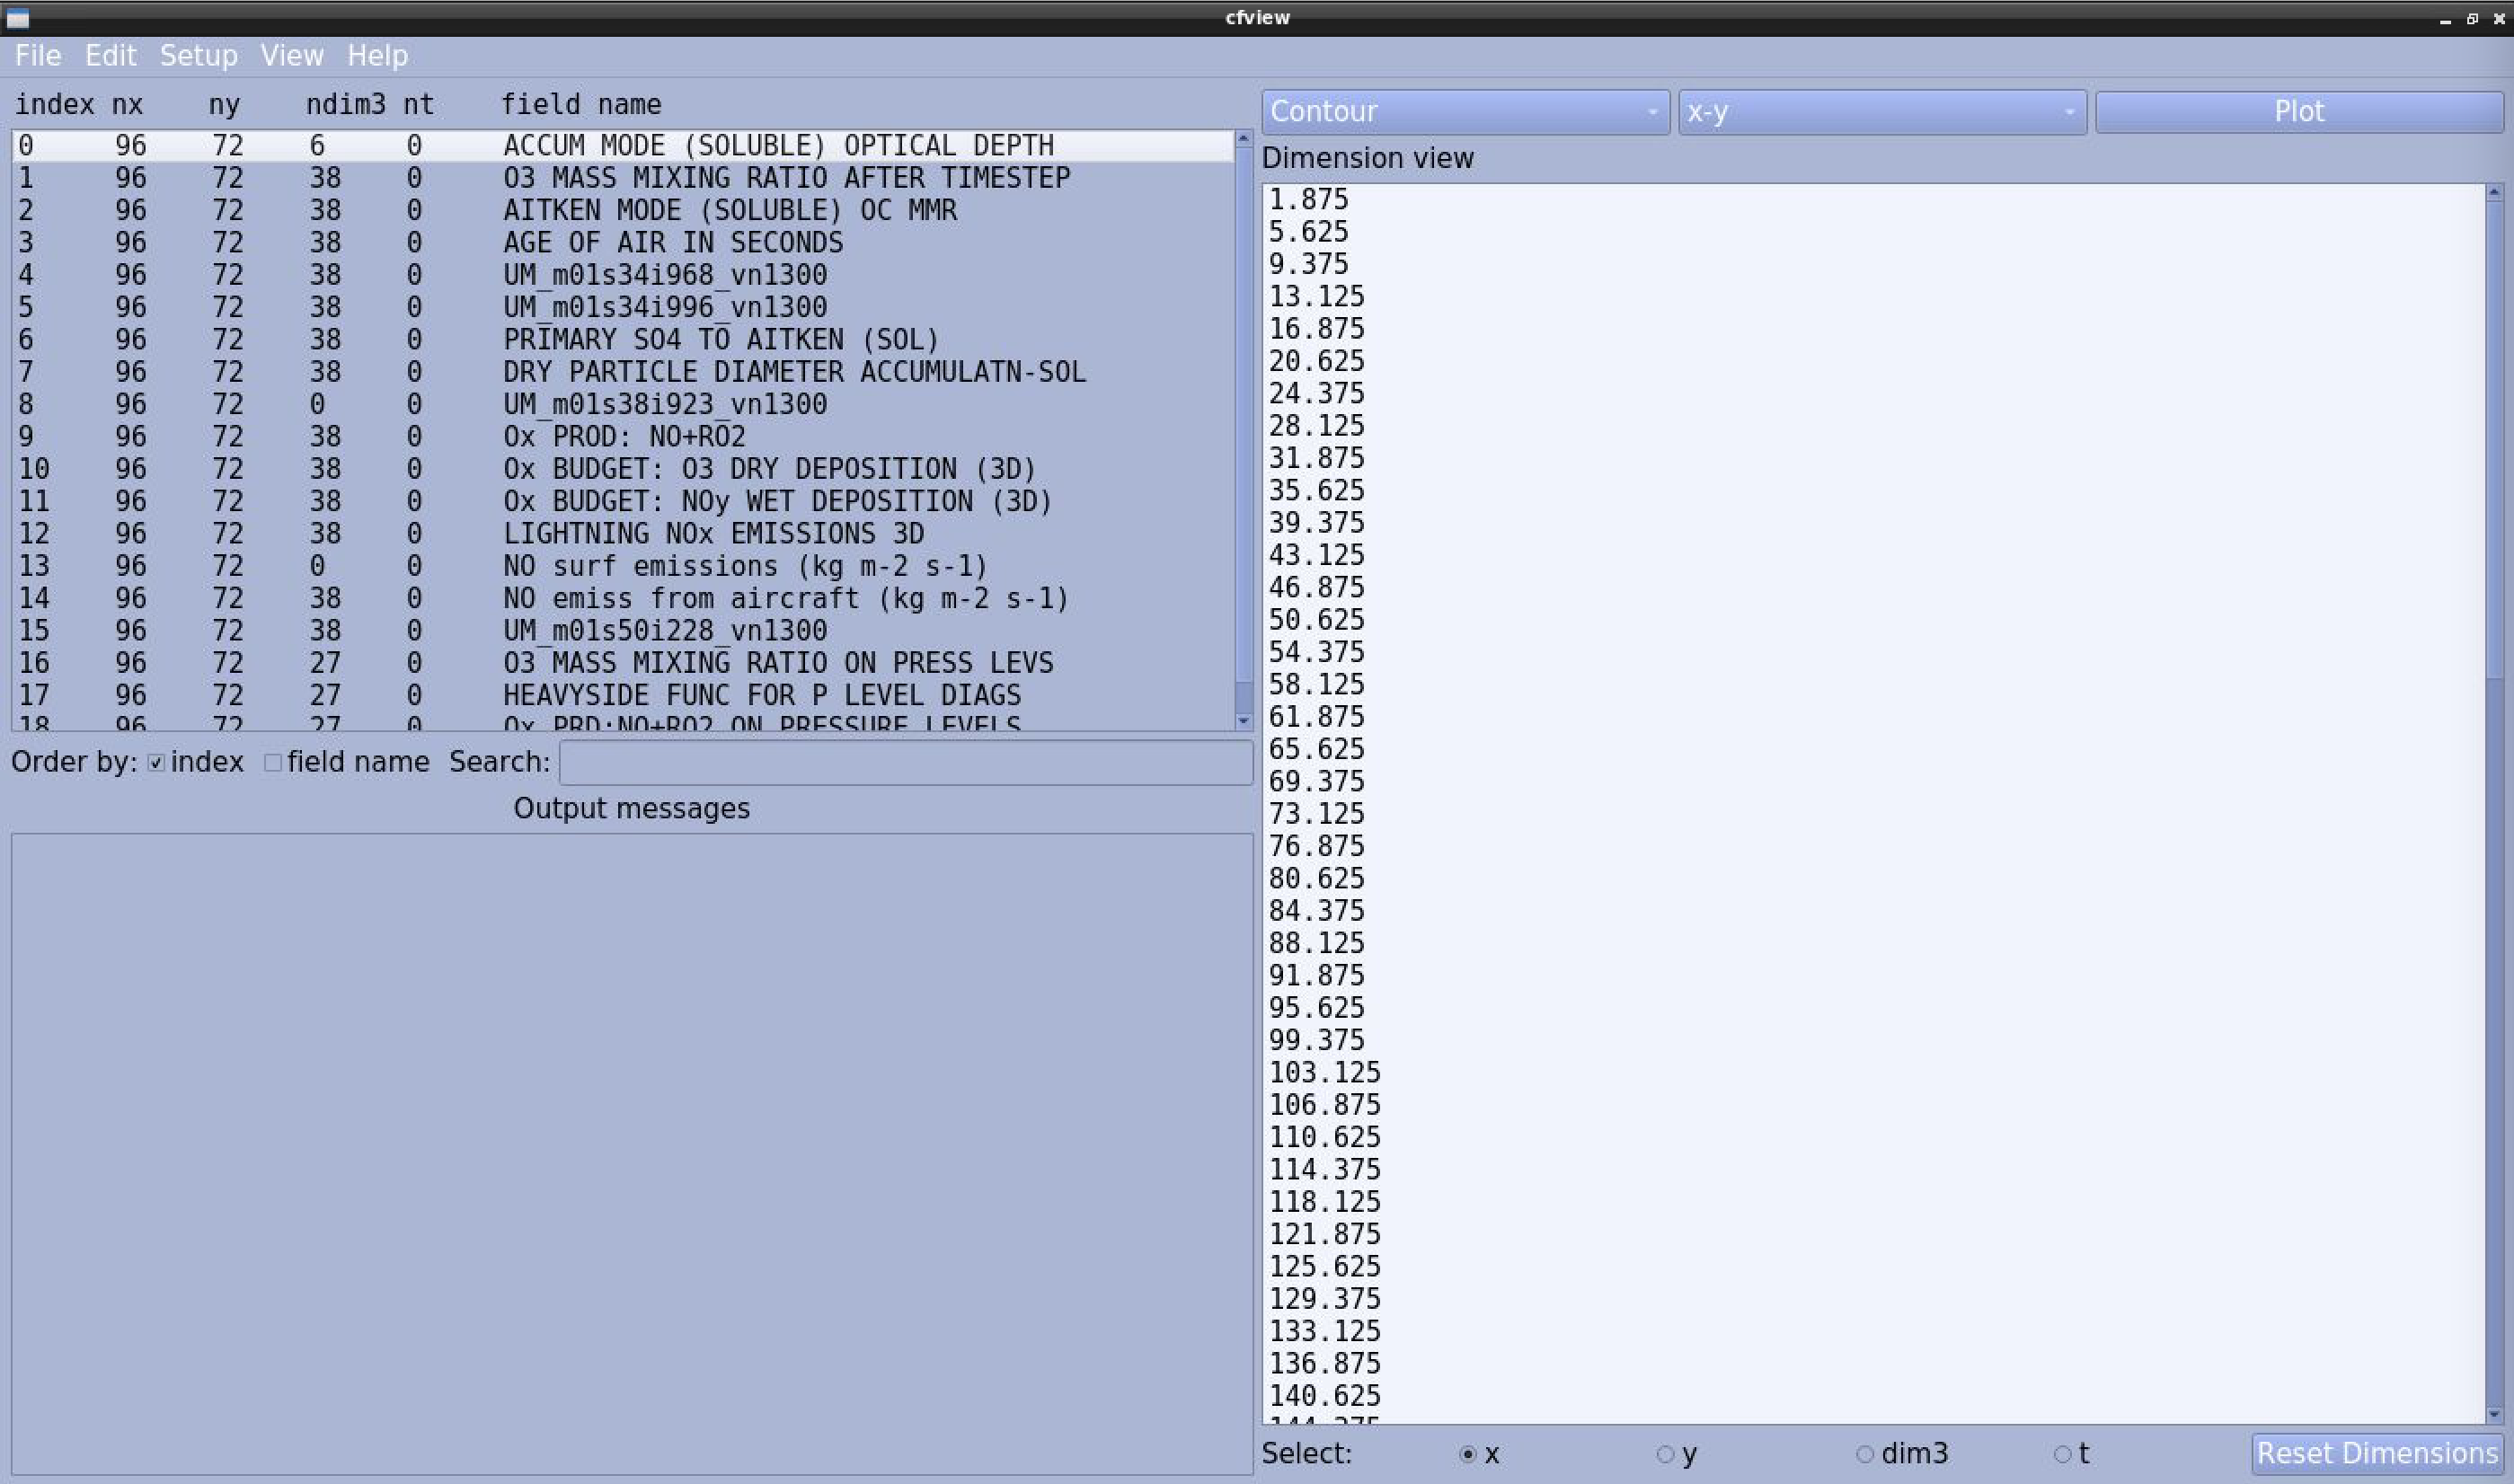
Example output from the UKCA training suite viewed using cf-view
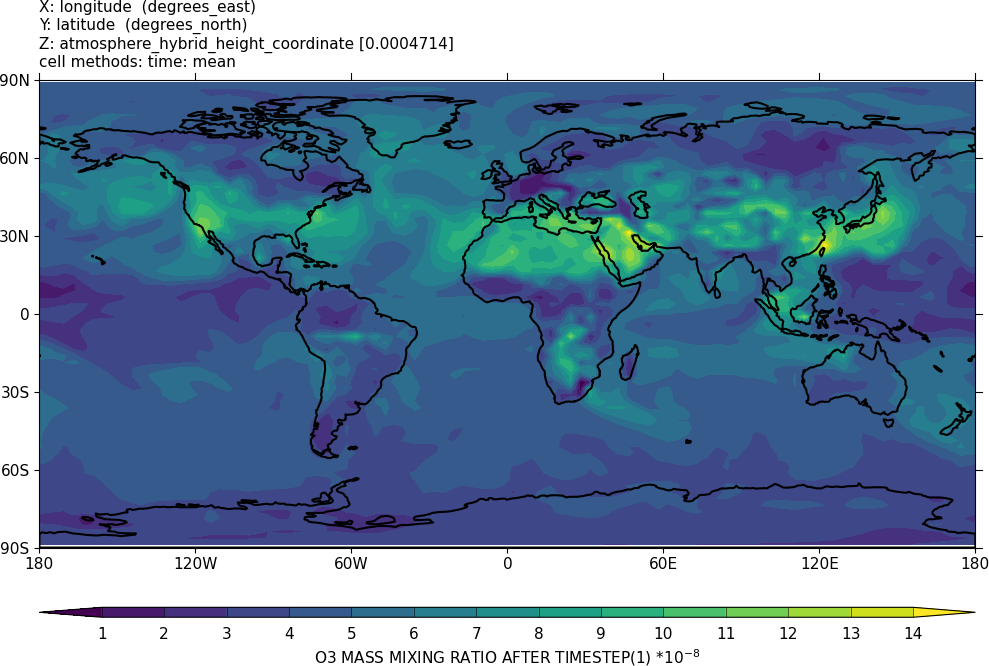
Surface ozone plotted using cf-view


For more detailed plotting, tools such as the Iris and cf-python libraries can be used to view UM file formats directly. However, for quick viewing, Xconv and cf-view are very useful tools. Information on how to install Xconv on the VM can be found here.
To view these files, do
xconv atmosa.pa19810901_00
or
cfview atmosa.pa19810901_00
As well as viewing files, you can use these tools to convert these files to netCDF. In Xconv, fill in the Output file name: box (e.g. foo.nc) and then clicking convert. If no path is defined, this will save the file in the same directory that you opened Xconv from. For cf-view, go to the file menu and select save.
Example output from the UKCA training suite can be found at
Tutorials/UMvn13.0/sample_output/UM_Base
Checklist
- ☐ Make use of search to find what you need in the suite.
- ☐ View UM output using cf-view or Xconv.
UKCA Chemistry and Aerosol Tutorials at UMvn13.0
Written by Luke Abraham 2022