Difference between revisions of "UKCA Chemistry and Aerosol Tutorials: Python notebooks"
| Line 12: | Line 12: | ||
directory using the <tt>pyterm</tt> command to open a terminal that is able to run the necessary Python libraries. |
directory using the <tt>pyterm</tt> command to open a terminal that is able to run the necessary Python libraries. |
||
| + | |||
| + | Copies of these scripts have also been made available on [https://github.com/theabro/ukca/tree/master/Tutorials/UMvn13.0/notebooks GitHub]. |
||
== How to connect == |
== How to connect == |
||
Revision as of 11:49, 26 January 2024
UKCA Chemistry and Aerosol Tutorials at UMvn13.0
During these Tutorials several Jupyter notebooks are provided using both cf-python and the Iris Python libraries. On pre-installed virtual machines these can be found in the
Tutorials/UMvn13.0/notebooks
Due to the SSH connection you will be making to these virtual machines, it is better to run jupyter remotely and then connect to it from the browser on your desktop machine.
You could also use equivalent python scripts held in the
Tutorials/UMvn13.0/scripts
directory using the pyterm command to open a terminal that is able to run the necessary Python libraries.
Copies of these scripts have also been made available on GitHub.
How to connect
- On your VM, change directory using the cd command into the directory that you want to run the scripts from, e.g.
- cd Tutorials/UMvn13.0/notebooks
- On your VM run the command jnotebook to start a jupyter notebook server, or jlab to start a jupyter lab server.
- On your personal computer, open a connection to your AWS instance using one of the methods below.
- On your desktop machine, connect to the following web address using a web browser (Firefox recommended):
Technical notes
The above instructions make use of some alias and shortcuts to work. The full details of this are:
On your personal computer
Windows via MobaXTerm
On Windows you can use MobaXTerm to connect to the AWS instance to tunnel through to allow you to run Jupyter remotely.
Graphical method
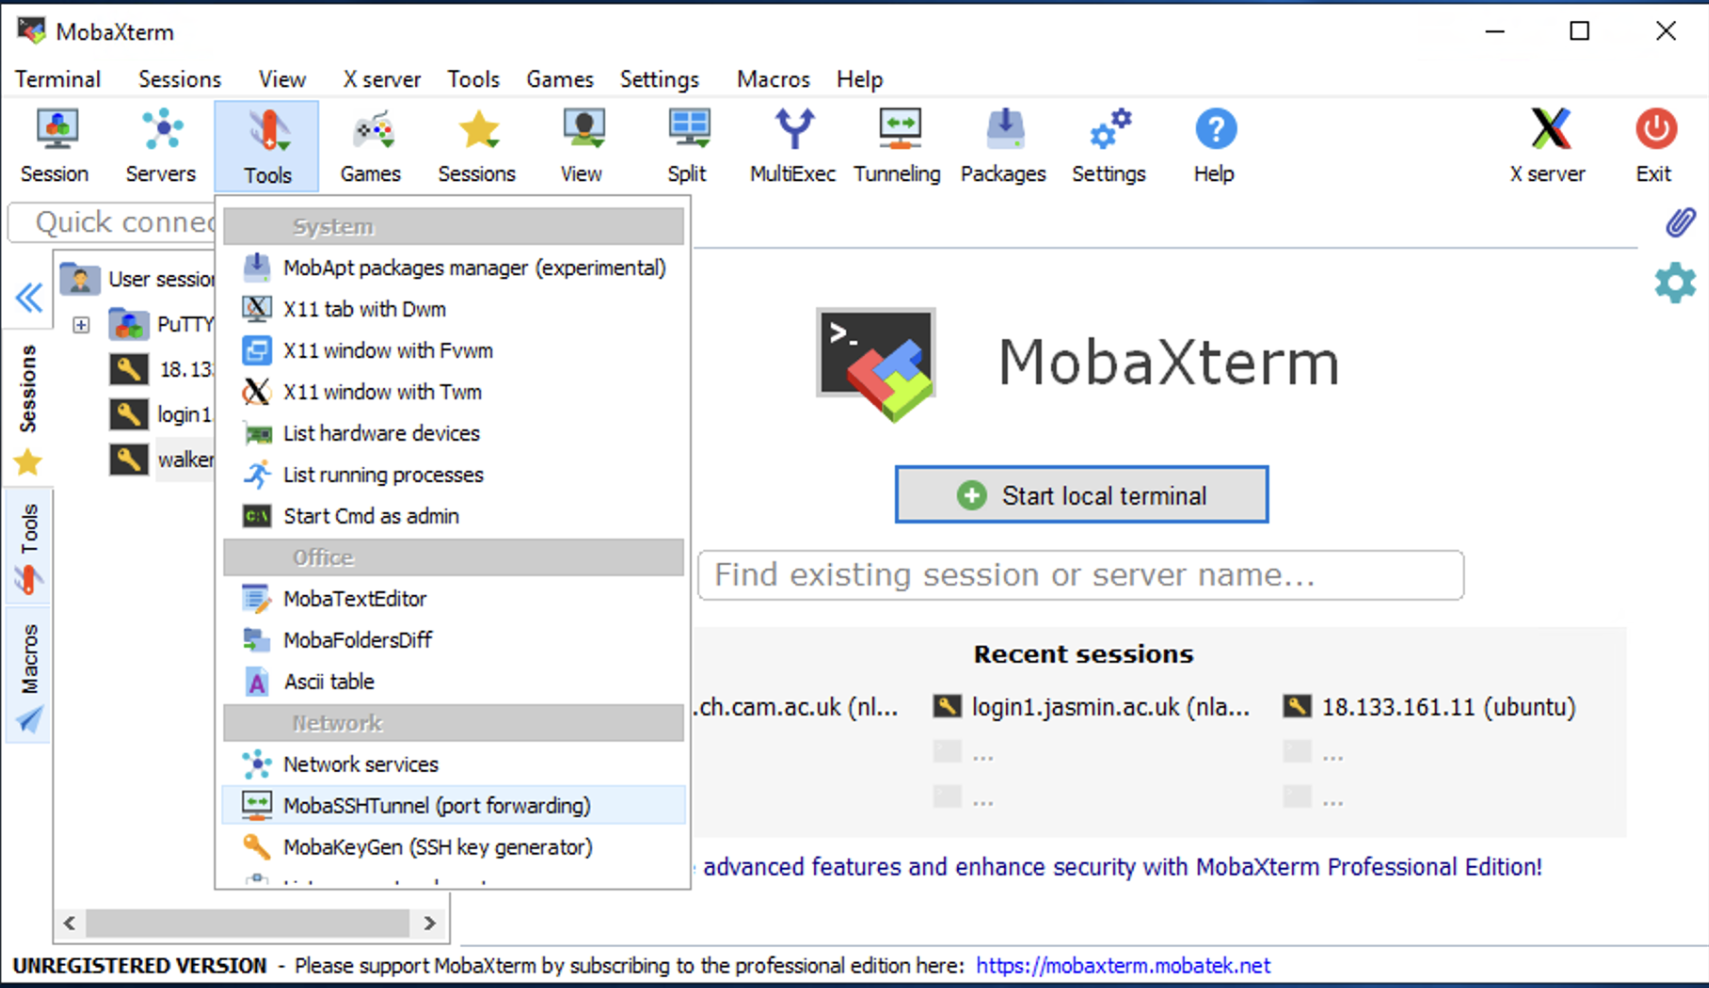
You can use the MobaSSHTunnel (port forwarding) tool to set this up. First, go to the Tools menu and select MobaSSHTunnel (port forwarding)
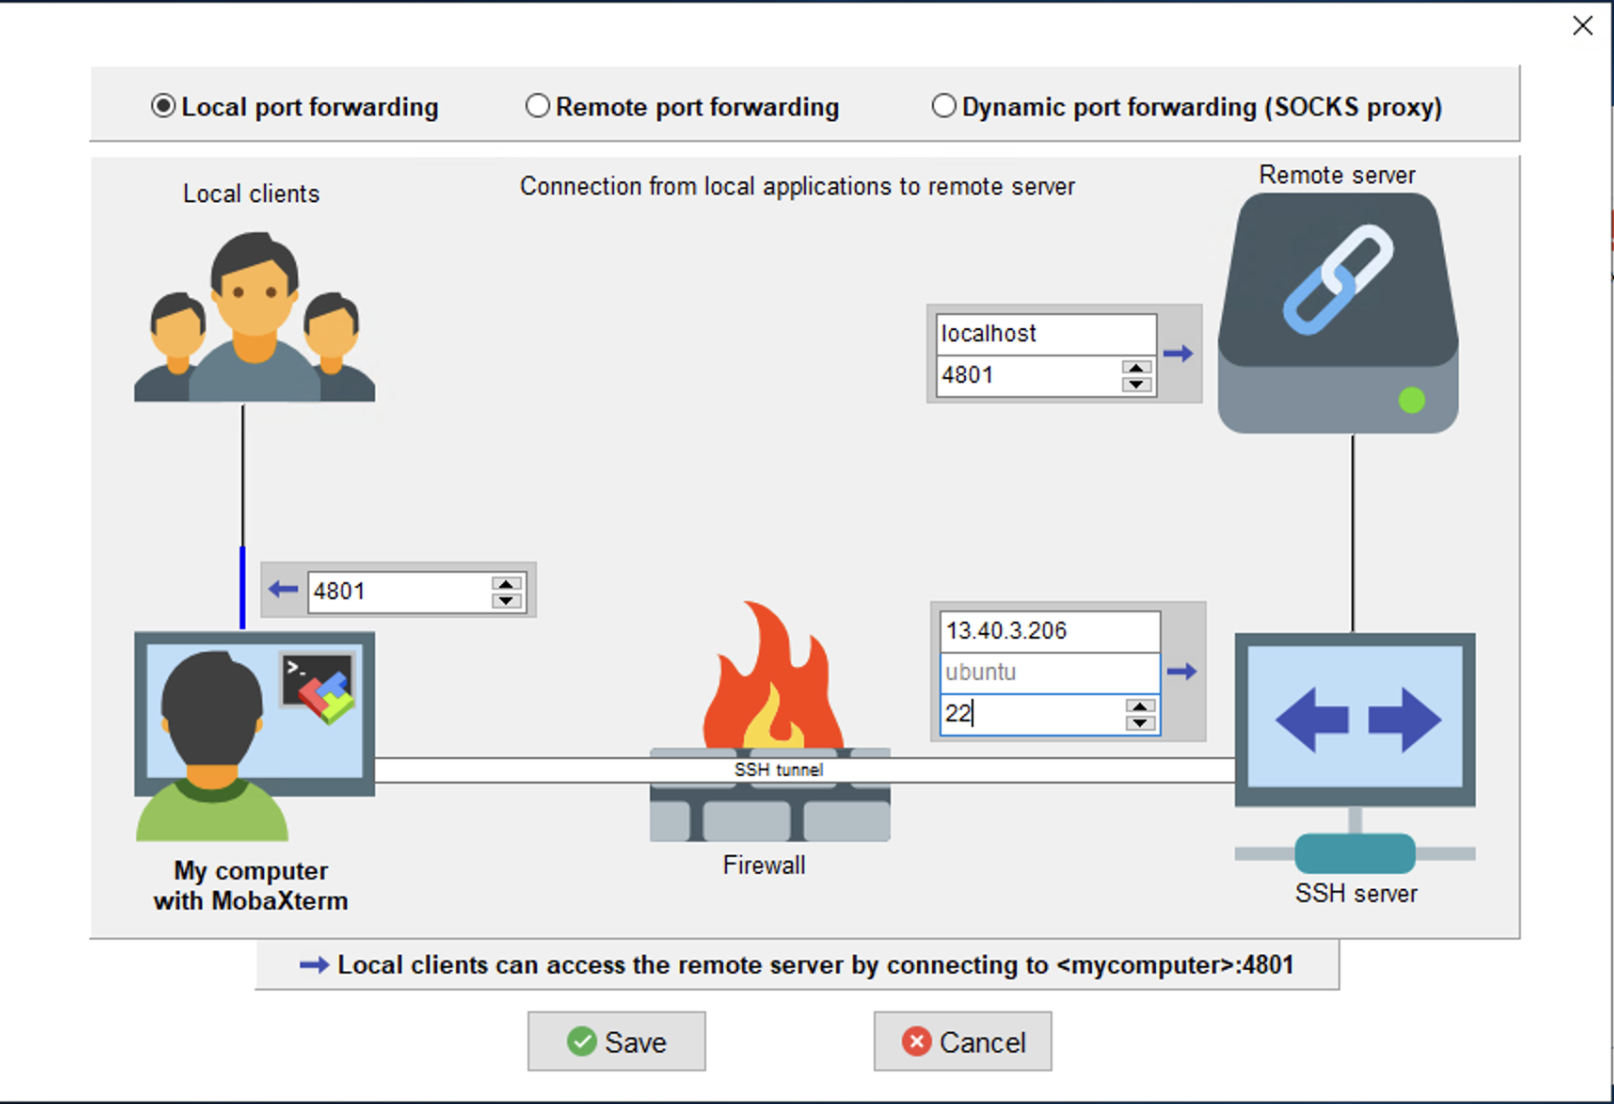
then click New SSH tunnel in the bottom left corner. Then you will need to set the following information, changing the <SSH server> information to the IP address of your training virtual machine
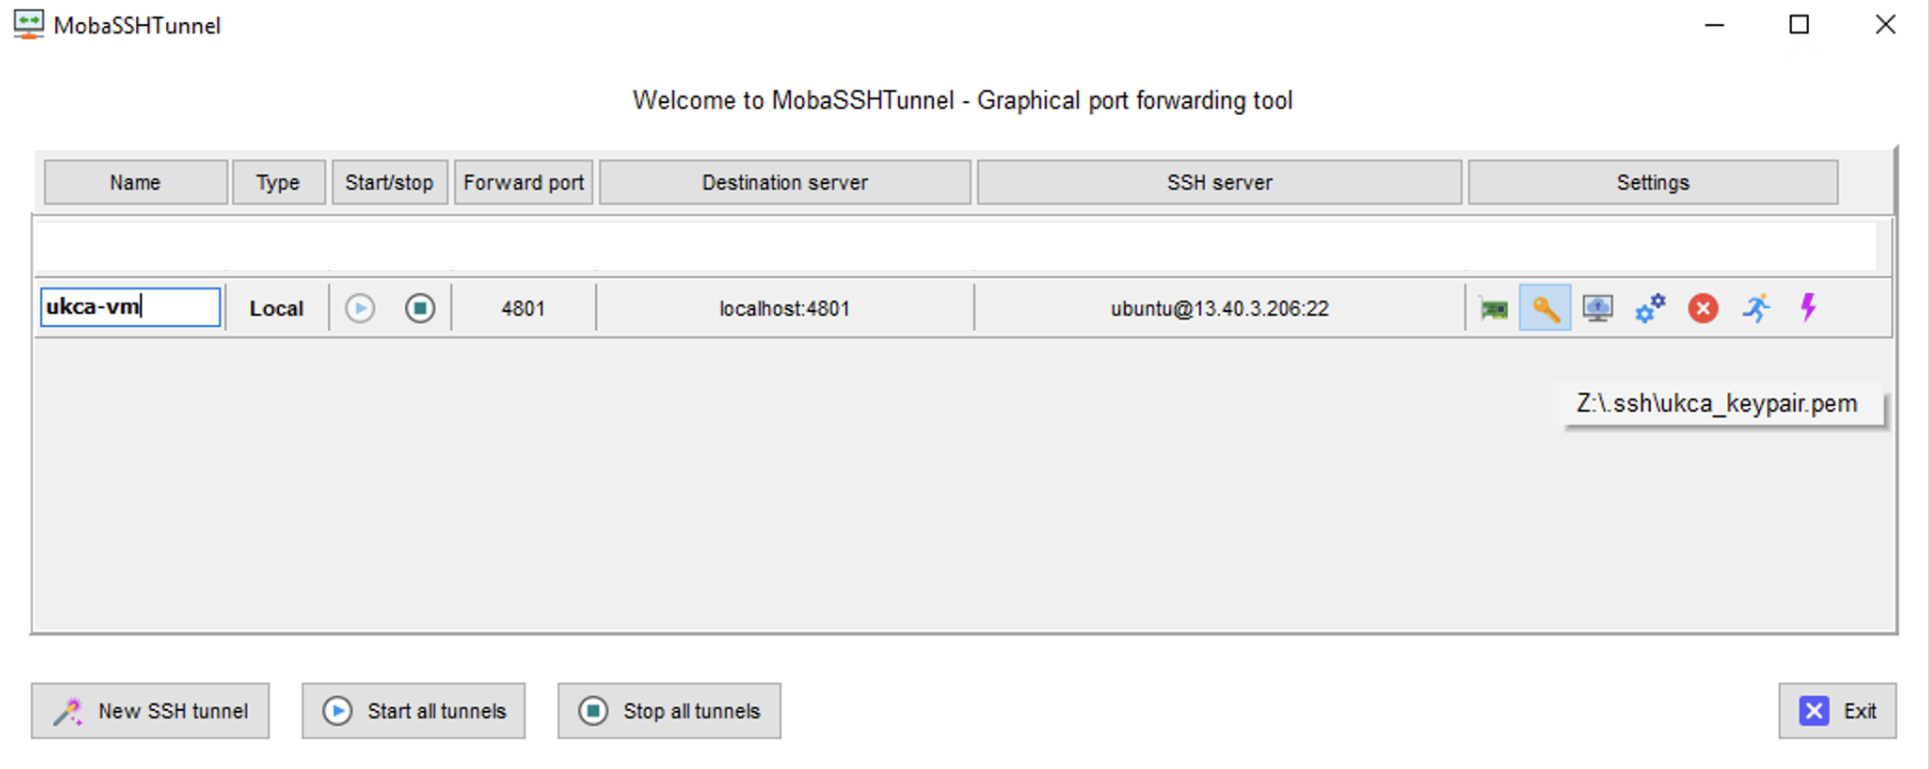
and then select your SSH key by clicking the key symbol, navigating to it using the file browser menu that will open, and selecting it
Once you have done this you can start and stop the tunnel by clicking the play (triangle) and stop (square) buttons.
| Option | Setting |
|---|---|
| <Forwarded port> | 4801 |
| <SSH server> | [EC2 VM IP ADDRESS] (e.g. 13.40.3.206) |
| <SSH login> | ubuntu |
| <SSH port> | 22 |
| <Remote server> | localhost |
| <Remote port> | 4801 |
| Set SSH key file via key icon on entry in main MobaSSHTunnel panel | The path to your [KEY NAME] key file (navigate via file manager) |
Terminal method
You could also do this by opening a local session, where you run the following command, e.g.
ssh -N -f -L localhost:4801:localhost:4801 -i /drives/x/path/to/[KEY NAME] ubuntu@[EC2 VM IP ADDRESS]
Where /drives/x/path/to/[KEY NAME] is the full path to the location of your private key file that you use to connect to the AWS instance and x is the drive letter, e.g. c for your C: drive.
Once this connection has been established you will be able to connect using the link above. To close this connection, you will need to shut down MobaXTerm.
SSH via a terminal (macOS or GNU/Linux)
You will be able to connect using the following SSH command:
ssh -N -f -L localhost:4801:localhost:4801 -i /path/to/[KEY NAME] ubuntu@[EC2 VM IP ADDRESS]
You could also edit your ~/.ssh/config file to include the following
Host ukca
        Hostname [EC2 VM IP ADDRESS]
        User ubuntu
        IdentityFile /path/to/[KEY NAME]
        HostKeyAlgorithms ssh-rsa
and then connect by
ssh -N -f -L localhost:4801:localhost:4801 ukca
You could also make an alias in your ~/.zshrc or ~/.bashrc, e.g.
alias jopen='ssh -N -f -L localhost:4801:localhost:4801 ukca'
and then use the command jopen from within your terminal.
Once the connection has been established you'll be able to connect using the link above.
On the virtual machine
You will not need to make any changes on the virtual machine - this section is for information only.
The two alias are set in the ~/.bashrc file on the VM:
alias jlab="lxterminal -l -e 'export PATH=~/miniconda3/bin:$PATH && jupyter-lab --no-browser --port=4801'"
alias jnotebook="lxterminal -l -e 'export PATH=~/miniconda3/bin:$PATH && jupyter notebook --no-browser --port=4801'"
and the
/home/vagrant/.jupyter/jupyter_notebook_config.py
file has the following setting
c.NotebookApp.token = 'UKCATraining'
This means that when you run the command jnotebook or jlab you then launch a new terminal pointing to the python installation in the /home/vagrant/miniconda3/bin directory.
If you have having issues connecting to the Jupyter server over SSH in your local browser and you are connecting via [UKCA_Chemistry_and_Aerosol_Tutorials:_Configuring_X2Go_for_AWS X2Go] then it is possible to open a local Jupyer instance using the Firefox browser installed on the VM. However, it will not be very responsive and might be quite laggy resulting in a poor user experience. It is not recommended to try to open Jupyer in the VM's browser over an SSH connection, as the performance will be even worse.


