Difference between revisions of "UKCA & UMUI Tutorial 1"
| Line 172: | Line 172: | ||
STASH will be discussed in more detail in the [[UKCA & UMUI Tutorial 2 | what is STASH?]] tutorial. |
STASH will be discussed in more detail in the [[UKCA & UMUI Tutorial 2 | what is STASH?]] tutorial. |
||
| − | |||
====The UKCA Panel==== |
====The UKCA Panel==== |
||
| + | |||
| + | The UKCA panel can be found in two ways, either by going to ''Atmosphere → Model Configuration → UKCA Chemistry and Aerosols'' or ''Atmosphere → Scentific Parameters and Sections → Section by section choices → Section 34: UKCA Chemistry and Aerosols''. This contains a number of follow-on windows which are used to configure the options for UKCA. |
||
| + | |||
| + | =====Main UKCA Panel===== |
||
| + | |||
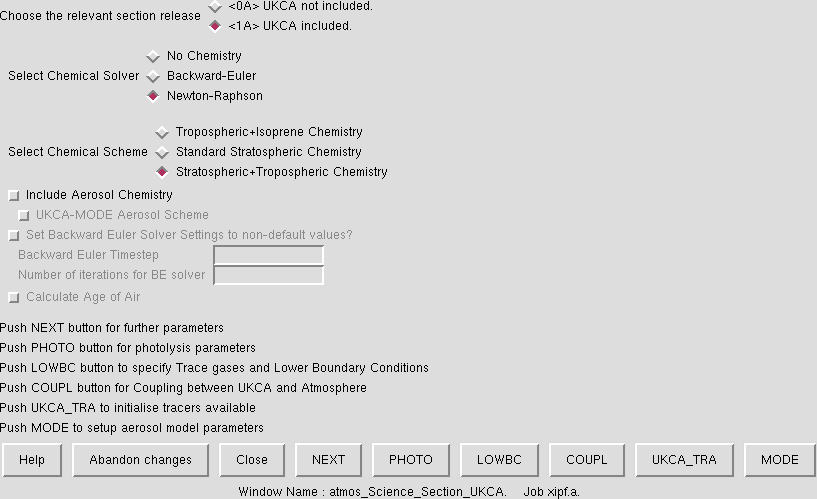
| + | [[Image:UKCA_UMUIPanel_Main.png|thumb|right|Figure 3: The main UKCA panel. This is running the ''CheST'' (Stratospheric+Tropospheric Chemistry scheme) using the Newton-Raphson chemical solver.]] |
||
| + | In this panel you can turn UKCA on and off, choose the solver to use, and which scheme to use using that solver (changing the solver choice will change the available schemes). The '''Help''' button on this page is quite informative. |
||
| + | |||
| + | =====Main UKCA Panel → NEXT follow-on window===== |
||
| + | |||
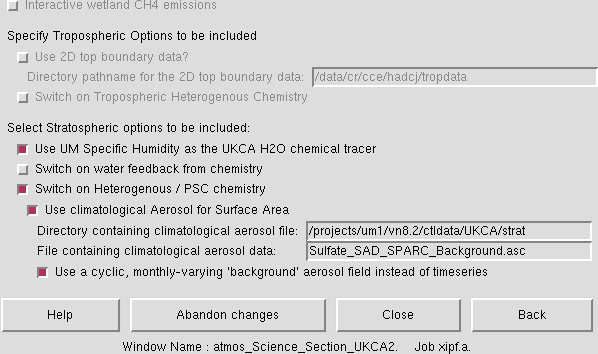
| + | [[Image:UKCA_UMUIPanel_Main_NEXT.png|thumb|right|Figure 4: The first follow-on window from the main UKCA panel, showing that this job uses the UM specific humidity field as the UKCA H2O tracer, that heterogeneous chemistry is on, and that a background (i.e. 12-monthly climatology) stratospheric aerosol field is being imposed.]] |
||
| + | In this panel you can set some optional swtiches, which will be available depending on the scheme used. Again, the '''Help''' button is extensive. It is suggested for Stratospheric chemistry schemes that the UM specific humidity field is always used as the UKCA H2O tracer. |
||
====Saving, Processing, and Submitting a Job==== |
====Saving, Processing, and Submitting a Job==== |
||
Revision as of 11:07, 10 June 2013
Exploring the UMUI
Getting hold of an existing UM-UKCA job
Before you can start using UKCA (and the UM generally), you first need to copy a UM or UKCA job from somewhere. You may be given a job from someone for a specific purpose, or you may just copy a standard job. In the UMUI there are two repositories of standard jobs, under the umui and ukca UMUI users. The umui user contains a series of standard jobs provided and maintained by NCAS-CMS. The ukca user contains jobs provided by the UKCA team.
Make a new experiment and take a copy of the UKCA Tutorial Base Job, filter for the ukca user and choose the correct experiment for the machine that you will be running on (HECToR: xxxx, MONSooN: xxxx). Select the a job, labeled Tutorial Base UM-UKCA Job and copy this one to your own experiment.
More details on how to copy UMUI jobs can be found in the NCAS-CMS Introduction to the UMUI tutorial video.
What is the UMUI
The UMUI is the Unified Model User Interface. It is used to configure UM model options and parameters, and, for climate simulations, is also used to manage submission of the job to the supercomputer. As well as inserting values into the Fortran namelists used by the model, it also checks the logical of those choices. It is also possible to add variables into the namelists directly using hand-edits, which will be discussed in more detail in the adding new chemical tracers tutorial.
The UMUI itself is rather complicated, with many different panels, but no search function. Without experience it can be difficult to find which panels are useful. While this tutorial will go through many of the panels that are useful or relevant to using UKCA, it is recommended that you take some time to familiarise yourself generally with the UMUI.
This list is not exhaustive, but should be useful as a reference. Only the panels that are directly relevant to configuring and running UKCA jobs will be discussed in any detail.
The UMUI: Quick Reference
The Main Window and the Interface Bar
When you start-up the UMUI you will be given a list of all your experiments. Along the top of this window there is a bar which gives a number of useful options
Search
The Filter option is very useful. This allows you to filter UMUI jobs by user, experiment ID, version etc. You will mostly be copying a job from another user (as you have done for this tutorial) and so will need to use the search function for this.
Experiment
This menu is used primarily to make a New experiment. It is advisable to use different experiments for different studies, as keeping multiple studies in a single experiment can become confusing. Each experiment has a unique 4-letter identifier, and you can have up to 26 jobs under each experiment, labeled a-z.
Job
You will often use the Job menu to Copy jobs from other users experiments, as described in the NCAS-CMS Introduction to the UMUI tutorial video. Another useful function is the Difference option, which allows you to compare, in detail, two different UMUI jobs (of the same UM version).
Get them to diff two different UKCA jobs, e.g. Base Job and Tracer Job
You can also use this menu to change the job description text or the job identifier (i.e. the a-z label) within the experiment.
If the UMUI is not closed down correctly, when you start it again and try to edit an existing job which you had open when the UMUI crashed you will get an error message telling you that the job is already open. In this case you can Force Close the job from this menu.
There is also a Help menu which may be useful.
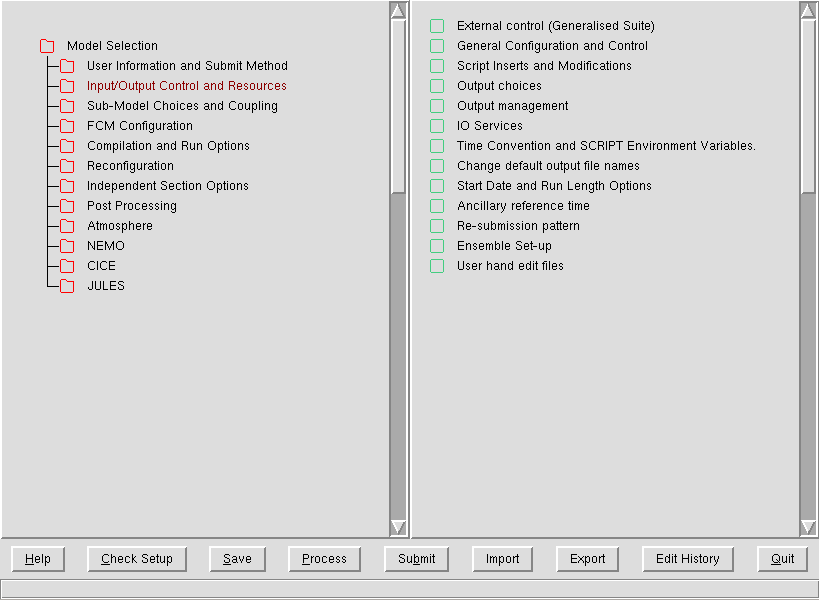
When you open a job from the UMUI, either as read-write or as read-only, you are given a new window with several buttons along the bottom and a single tab labeled Model Selection. Clicking on this tab will give you a number of options, and we will go over the more relevant of these below.
User information and Submit Method
General details
In this panel you will set your user-id on the remote supercomputer (the $USERID variable), your email address, and the accounting (or TIC) code. These changes will also have been covered in the NCAS-CMS Introduction to the UMUI tutorial video.
Job submission method
This panel determines what computer you will be running on, and how long the NRUN step (see information on the Compile and Run Options below) will request in the supercomputer queue. To access this information you will need to select either LoadLev (for MONSooN) or Qsub (for HECToR).
It is unlikely you will need to change any information in this panel.
Input/Output Control and Resources
Output Choices
In this window you can change the level information given by the output messages that are placed in the mode output .leave file (for more information on this file, see the running existing UKCA Job tutorial).
Time Convention and SCRIPT Environment Variables
Often the directory containing an input ancillary file is not specified explicitly, but is instead specified using an environment variable (e.g. $UKCA_EMISS). These environment variables are set here.
This panel also defines the directories where the job will be run from, $DATAM and $DATAW.
Start Date and Run Length Options
A simple panel where the start date of the run and the number of years, months, days, etc of the run is set. It is best to use, e.g. 1 month rather than 30 days, or 1 year rather than 12 months.
Re-submission pattern
This panel sets whether or not re-submission is used (for most jobs over a few months in length, re-submission will always be used) and how long that job-step has requested in the queue on the supercomputer. This number may be different to that set in the User information and Submit Method → Job submission method window.
FCM Configuration
FCM Extract directories and Output levels
This panel contains the directory that your source code will be extracted to, prior to compilation (the UM_ROUTDIR field). You may need to change this field. For MONSooN users it is often the same as the directory your job will run from, which will be similar to
/projects/project/$USERID/um
(setting your project as appropriate). For HECToR users this should be something like
/home/n02/n02/$USERID/um
(for those in n02) as it is faster to extract to /home than /work. Note that you will have already set the $USERID value in the User Information and Submit Method → General details panel.
In this panel you can also force FCM to run a full extract and build of an existing directory, rather than just doing incremental extracts ones.
FCM Options for Atmosphere and Reconfiguration
This panel tells the UM which branches from the FCM repository to include in the build, or if you want to take source code from a working copy on PUMA. When you are adding new source code you will need to make changes here.
Compilation and Run Options
Compile and run options for Atmosphere and Reconfiguration
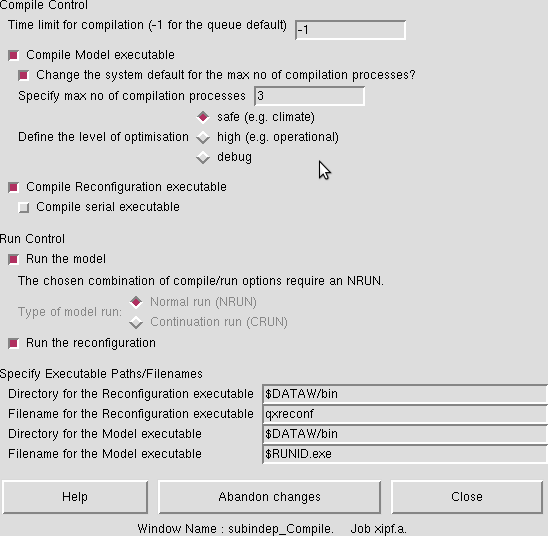
An example of this window can be seen in Figure 2. This window is used to tell the UMUI if you want to compile and/or run the model. If you are just running the model you can also select a CRUN (continuation run) step, which is done during the automatic re-submission.
This window gives the option to run the reconfiguration step or not. Reconfiguration will be discussed in more detail below.
UM User Override Files
In this panel you can define over-ride files which are used to change the compiler flags for some (or all) source files. It may be that you need to change the optimisation level of a routine, for example, and this is done here.
Reconfiguration
The reconfiguration step is used to create the initial conditions (.astart) file for the atmosphere model. Often this is done by supplying an existing restart (or dump) file produced by another model run. If no changes need to be made to this file then the reconfiguration step does not need to be run, but if anything does need to be done, such as changing the year of the dump file, or inserting a new field (as will be done in the adding new chemical tracers tutorial) then this step needs to be performed.
General Reconfiguration Options
If reconfiguration has been requested in the Compilation and Run Options → Compile and run options for Atmosphere and Reconfiguration panel, then you can set more switches here, such as changing the year in the file. More reconfiguration options are also set in Atmosphere → Ancillary and input data files → Start dump.
Post Processing
More information on the Initialization and processing of mean & standard PP files panel will be covered in the What is STASH? tutorial.
Main Switch + General Questions
This panel covers post-processing to be applied to a job as it runs, such as deleting superseeded files, and the archiving of data to various places, depending on the supercomputer. On MONSooN this can be used to send data to the /nerc disk.
Atmosphere
The atmosphere tab is used to control the majority of the settings in the UM model, and so it is divided into a number of sub-levels. A few of the most relevant to UKCA are discussed below.
Model Resolution and Domain → Vertical
This panel gives the location (on the supercomputer) of the namelist giving the specification of the level structure. You will need this file to use with Xancil when producing 3D ancillary and initial condition files. Xancil will be discussed in more detail in the adding new emissions tutorial.
Model Configuration → UKCA Chemistry and Aerosols
This is a link to the UKCA panel (which can also be found in Atmosphere → Scentific Parameters and Sections → Section by section choices → Section 34: UKCA Chemistry and Aerosols). This will be dicussed in detail below.
Scentific Parameters and Sections → Section by section choices
The panels in this menu contain a large number of the UM sections (including UKCA) and various options for each of these sections can be selected, and viewed, by clicking on the required tab, e.g. Section 1: SW Radiation etc.
Scentific Parameters and Sections → Spec of trace gases
The panels in this menu allow the values of the trace gases of CH4, N2O, CFC-11, CFC-12, CFC-113, CFC-114, HCFC-22, HFC-125, HFC-134a, and CO2 to be set for use in the radiation scheme. Depending on settings in the UKCA panel, UKCA can use these values as the lower boundary conditions for the mixing ratios.
Ancillary and input data files → Start dump
In here you set the original restart (dump) file that is read-in by the model, and the type of interpolation that will be applied to it, if it doesn't match the existing model resolution (i.e. is it possible to initialise a N96L85 model with a N48L60 start dump).
The Ancillary version files is used to define two files which give a set of standard names and locations of input ancillary files, which are then used in the Ancillary and input data files → Climatologies & potential climatologies sections.
Ancillary and input data files → Climatologies & potential climatologies
This menu lists all the possible ancillary files that are read-in by the model. Key ones are the sea surface temperatures and sea ice fields, where the SSTs and Sea-Ice ancillaries are specified. At UM8.2 you may find that the directory and file name are both environment varibles (e.g. $UM_ANCIL_SST_DIR and $UM_ANCIL_SST_FILE). These are set in the Ancil versions and Ancil filenames files which are set in the Ancillary and input data files → In file related options → Ancillary version files panel.
UKCA emissions are held in the user multi-level ancillary file & fields (for 3D emissions, e.g. aircraft NOx) and user single-level ancillary file & fields (for suface emissions, e.g. CO etc.). It is standard to have an update time of 5 days for these emissions (for monthly mean data).
Ancillary and input data files → Other ancillary files and Lateral Boundary files
In this menu you will find the orography, land-sea-mask, and land fraction file specifications.
STASH
STASH will be discussed in more detail in the what is STASH? tutorial.
The UKCA Panel
The UKCA panel can be found in two ways, either by going to Atmosphere → Model Configuration → UKCA Chemistry and Aerosols or Atmosphere → Scentific Parameters and Sections → Section by section choices → Section 34: UKCA Chemistry and Aerosols. This contains a number of follow-on windows which are used to configure the options for UKCA.
Main UKCA Panel
In this panel you can turn UKCA on and off, choose the solver to use, and which scheme to use using that solver (changing the solver choice will change the available schemes). The Help button on this page is quite informative.
Main UKCA Panel → NEXT follow-on window
In this panel you can set some optional swtiches, which will be available depending on the scheme used. Again, the Help button is extensive. It is suggested for Stratospheric chemistry schemes that the UM specific humidity field is always used as the UKCA H2O tracer.


